

Structural
Solar roof attachments by roof type: L-feet, standoffs, tile hooks and seam clamps
Short answer
The attachment is chosen by the roof covering. Composition shingle roofs use flashed L-feet lagged into the rafters; flat roofs use flashed standoffs or ballast; concrete and clay tile roofs use tile hooks fastened beneath the tiles; and standing seam metal roofs use seam clamps that grip the seam without going through the roof. Each one is drawn as its own detail on the permit set's mounting sheet, and it has to match the roof that's actually on the house.
Why the roof covering decides the mount
The racking above the roof looks much the same on most homes: rails, clamps, modules. What changes from roof to roof is the attachment — the piece that connects the racking to the building and keeps water out wherever it goes through. Every roof covering behaves differently when you fasten through it, so each one has its own attachment.
On a permit set, the attachment is drawn as a detail on the mounting sheet, and the reviewer checks that it matches the roof covering on the house. See what's in a solar permit plan set for where it sits in the set.
Composition shingle: flashed L-feet
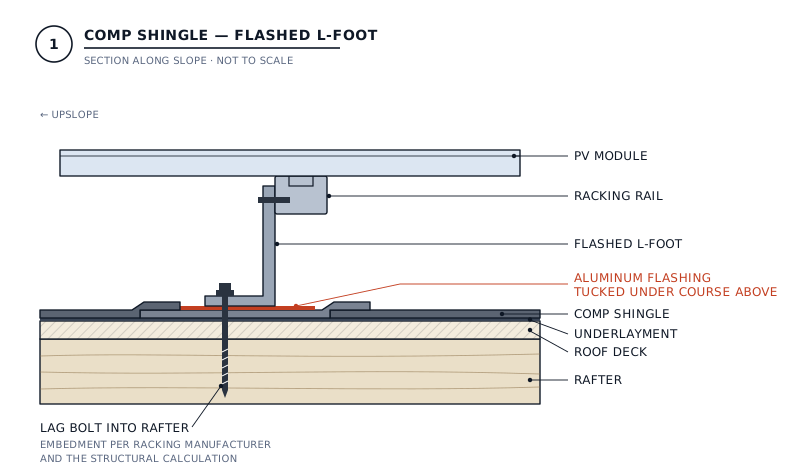
An aluminum flashing is slid under the shingle course above the attachment point, so water running down the roof passes over it instead of into the hole. The L-foot sits on the flashing, and a lag bolt goes through both, through the roof deck, and into the center of a rafter. The rail bolts to the upright leg of the L-foot.
The detail on the permit set shows the flashing and how it laps, the fastener size, its embedment into the rafter, and the rafter size and spacing. Attachment spacing along the rail comes from the racking manufacturer's span tables for the site's wind and snow loads.
Watch for: a lag that misses the rafter and only bites into the sheathing, which has almost no pull-out strength; and flashing laid on top of the shingles rather than tucked under the course above, which will leak.
Flat roofs: flashed standoffs
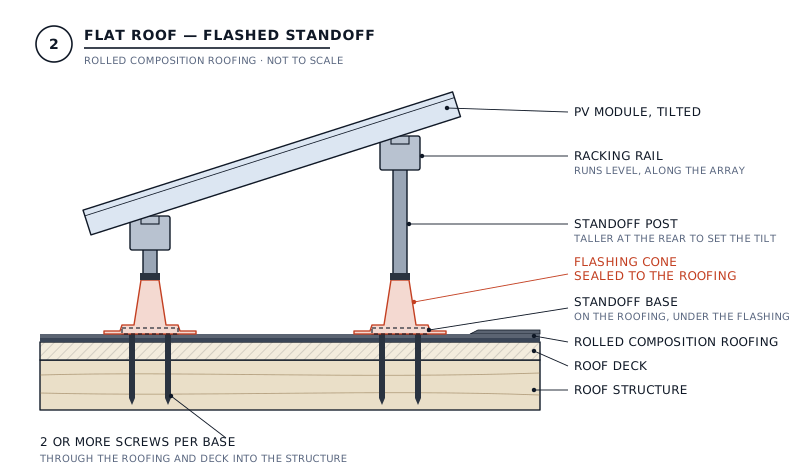
Flat and low-slope roofs are covered by a continuous layer of roofing — rolled composition on most homes, or modified bitumen, TPO or EPDM — so there are no shingle laps to tuck a flashing under. Instead, the standoff's base plate sits on top of the roofing and is screwed down through it with two or more screws, through the roof deck and into the structure. A flashing cone then slips over the post, covers the base and is sealed to the roofing.
The rails run level along the length of the array — one on short standoffs at the front, one on taller standoffs at the rear. That difference in height is what tilts the modules toward the sun and helps them shed water; the rails themselves never slope.
The alternative is a ballasted system: racking that sits on the membrane and is held down by concrete blocks, with no penetrations at all. That trades holes in the roof for weight on it, so the structure has to carry the ballast as well as the array — and in high-wind areas some mechanical attachment is often still required.
Watch for: flashings that aren't sealed properly to the roofing — a badly sealed cone is a leak. On newer roofs, check the roofing warranty too: many require the roofing contractor to make any penetrations.
Tile roofs: tile hooks
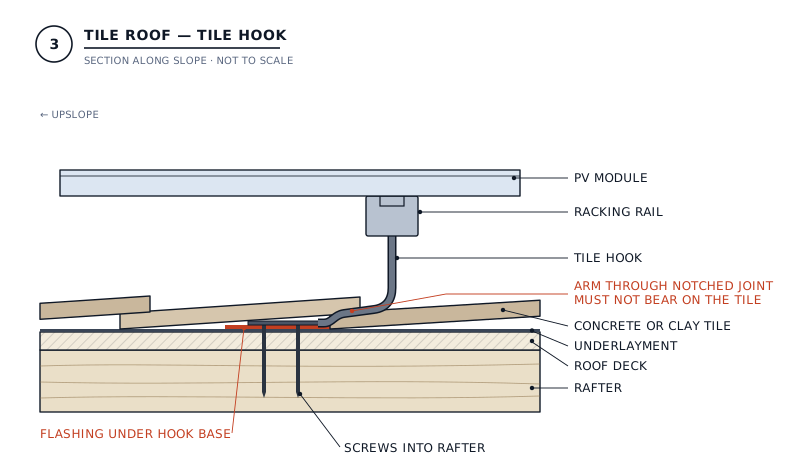
Concrete and clay tiles are heavy and brittle, and they can't take a point load. A tile hook gets the racking above the tiles without leaning on them. A tile is lifted, the hook's base is fastened through flashing into the rafter on the deck below, and its arm rises through the joint between two tiles, over the tile surface, and up to the rail.
The tile that sits over the arm usually needs a notch ground into it so it lies flat again. The hook must never bear on the tile: under snow or wind load, a hook pressing on a tile will crack it.
Clay tile is more fragile than concrete. Some installers use tile replacement mounts instead — a flashed metal or composite tile with the mount built in — or remove a section of tile and flash onto a shingle base.
Watch for: tiles cracked during installation, hooks bearing on the tile, and broken or displaced tiles that weren't replaced. An inspector may walk the roof to check.
Standing seam metal: seam clamps
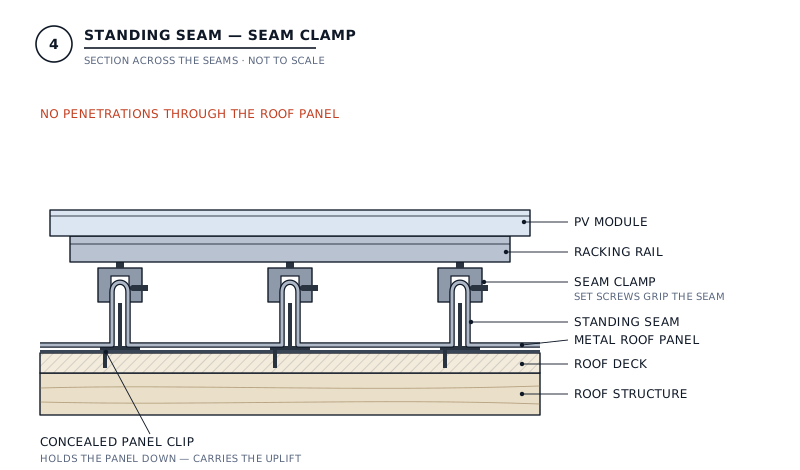
A standing seam roof has raised seams where the metal panels join, and that seam is strong enough to carry the racking. A seam clamp fits over the seam and grips it with set screws that press into the seam without piercing it. S-5! is the best-known brand, which is why installers often just call them “S5 clamps”. Nothing goes through the roof panel, so there's nothing to flash.
The clamp has to match the seam. Seams are formed in several different profiles and each clamp model is made for particular ones, so the seam profile needs identifying before anything is ordered.
Watch for: the roof panel's own attachment. The panels are held down by concealed clips fastened to the deck, and the array's wind uplift travels through those clips — so their spacing and the deck they're fastened to are part of the structural check. Exposed-fastener metal roofs, the corrugated or ribbed panels screwed through the face, aren't standing seam and use different brackets.
At a glance
| Roof | Attachment | Through the roof? | Main watch-out |
|---|---|---|---|
| Composition shingle | Flashed L-foot, lagged into the rafter | Yes, flashed | Missing the rafter; flashing not lapped under the course above |
| Flat / low-slope | Flashed standoff, or ballast | Standoff: yes, with a flashing cone. Ballast: no | Sealing the flashing; ballast weight on the structure |
| Concrete or clay tile | Tile hook through the tile joint | Yes, flashed under the tile | Hook bearing on, or cracking, the tile |
| Standing seam metal | Seam clamp | No | Matching the seam profile; panel clip capacity |
What the plan reviewer checks
Whatever the roof, the reviewer looks for the same things on the attachment detail: that it's drawn for the roof covering actually on the house, that the fastener and its embedment are stated, and that attachment spacing agrees with the racking manufacturer's tables for the site's wind and snow loads. A detail drawn for the wrong roof is one of the most common reasons a set comes back.
On re-roofs, tile and marginal framing, many jurisdictions also want sealed structural calculations behind the detail. See when you actually need a structural stamp, or add a structural PE stamp to your plan set.